
The exposure time is the value (usually expressed in seconds) that indicates how long you would expose a camera sensor to light for a single frame. It is also sometimes known as the shutter speed. If you use a mono camera, you have to consider additional factors because each filter absorbs a different amount of light, which changes (increases) the exposure time. The situation becomes a bit more complicated when you start using the narrowband filters, but let’s not worry about that now.
The key to understanding that is to know how the camera works. The camera captures light using a digital sensor, usually a CMOS sensor, which consists of pixels. Each pixel converts photons into electrical signals, or should I say, electrical charge. A CMOS sensor, depending on the model, consists of millions of such pixels, so the image from the telescope lenses is “displayed” on the sensor and charges the pixels. The brighter the picture, the faster the pixels are charged. Also, longer exposures lead to higher charges. After the given time, the “map” of the charges is downloaded from the sensor, all pixels are discharged, and the subsequent exposure begins.
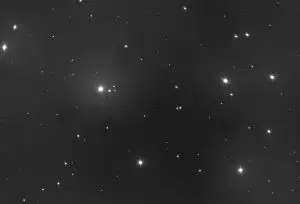
The goal is to calculate the exposure time to maximise the amount of light but avoid “overcharging” the pixels. Such overcharge may occur if the exposure time is too long for a given condition, such as object brightness, or when the area has Bortle 6 or higher light pollution. In this case, we will end up with the pixels that will not represent the current differences between the regions. The example of such overcharge is shown below. You can see the characteristic crosses and the halos around the bright stars.
What can we do about it? There are a few things we can try to avoid the burning of the pixels effect.
First, you need to decide which gain you will use during your sessions. This depends on the camera you use, but the general rule is that the lower the gain, the lower the noise. Now, you need to keep in mind that if you want to keep your stars’ cores within reasonable limits (not oversaturated), you should have the exposure time for each filter adjusted according to the ratio L:RGB as 1:111 (sometimes, when shooting the faint DS objects, you can use the 1:1:1:1). Ratio 1:111 means L:RGB and taht means the total L time should be equal to the combined times of R, G and B.
Let’s have an example. Your goal is to shoot pictures for 4 hours. That means you take 2 hours of Luminance (120 minutes in total) and 2 hours of Red (40 minutes), Green (40 minutes), and Blue (40 minutes) for a total of 120 minutes. This simple calculation shows the total time spent on each filter, but does not show the time required for each frame, which is equally important. The general rule is to:
- Keep the gain low.
- Keep the time low enough to avoid overexposure.
- Better to stack more frames with the low amount of light than fewer overexposed frames.
Please remember that you do not have to keep the same gain across all frames, but you have to maintain the same sensor temperature. That leads us to the following conclusion: you can decrease the gain on the Luminance frames and slightly increase it on the other filters.
So, what about the single frame exposure? Here it is…
Luminance 30 to 60 seconds – Short enough to keep star cores from clipping quickly, but long enough to collect significant light.
Red (R) 60 to 90 seconds. Red filters pass less light than Luminance, so you can generally go longer without saturating the sky background.
Green (G) & Blue (B) 90 to 120 seconds. Green and Blue filters are most affected by sky glow in light-polluted areas, but they also pass less light from the target, allowing for potentially longer subs. Some photographers may keep them at 60-90 seconds to better match the L subs.
Pro-tip: for an individual sub-exposure (light frame), the goal is to have the histogram peak (mostly sky glow) sit about one-third to halfway from the left side of the graph. Test a few exposures for each filter to achieve this balance. When you practice your single exposure frame, you will determine how many frames are needed to collect the right amount of light in total.
So, summarising:
- Keep your gain low
- For the LRGB, follow the 1:1:1:1 rule or, even better, the L: RGB as 1:111
- Keep in mind that each filter passes a different amount of light, so it is a good idea to adjust the time to the filter and keep the total time by the number of frames

More Stories
A Magnitude confusion
What is Bortle?
What is harmonic mount